Direction For Use
DeguDentPurpose
Pressable ceramic material for inlays, onlays, veneers and crowns. Cergo Kiss pressable ceramics can be excellently veneered with Duceragold Kiss veneering ceramics.
For dental use only.
Technical Data
• Dental ceramic material: Type 2, Class 1 according to DIN EN ISO 6872
• Flexural strength and chemical solubility according to DIN EN ISO 6872
Precautions
•Use only glass beads (2–4 bar), not aluminium oxide, for air-abrading the frameworks.
•Use water cooling when working with the pressable ceramics to avoid local overheating.
Transport and storage
• Liquids: Store containers tightly closed at temperatures above 10°C.
•Protect powder from moisture.
Combinable liquids
• Dentine/incisal, etc.: Ducera® Liquid SD, Ducera® Liquid Form
•Paints/glazes: Ducera® Liquid Stain improved
Processing
Die preparation (Figure 1)
• Establish the preparation margin.
•Use die hardener on the die.
•Apply die spacer on the dye.
• For veneers, inlays, onlays or crown frameworks.
Wax modellation (Figure 2)
Use only wax materials that burn out without residue.
Use Isolit isolating liquid.
For all restorative geometries, the wax modellation must have a minimum thickness of 0.7 mm (maximum wall thickness: 2.5 mm). For posterior teeth, wax up a reduced
anatomical form (including the occlusal profile), a type of dentinal core, in order to ensure sufficient stability.
Sprueing (Figure 3)
•Wax up the pressing sprue in the position of maximum circumference, in the direction of the flow (incisal for copings, proximal for inlays). Make sure the diameter of the sprue is not reduced at the contact point; ensure a large connection area.
•Sprue length for Cergo Press: 5–6 mm; for Multimat® 2 Touch+Press: 2–3 mm.
• Position all pressing objects at the edge of the base at the same height, i.e. with all object margins at the same level. This will automatically result in sprues of different length. That is fully acceptable.
Up to 0.6 g wax weight: 1 pressing pellet 100-g muffle
Up to 1.4 g wax weight: 2 pressing pellets 200-g muffle
Up to 4.8 g wax weight: 8 pressing pellets Cercon® PressMaster muffle (400 g)
Investing (Figure 4)
•Place the muffle ring on the muffle former.
•Mix the investment material (Cergo fit or Cergo fit SPEED) as per the manufacturer’s instruction. Vibrate lightly into the muffle avoiding bubble formation, until all objects are completely covered with investment. Top off the muffle without vibrating.
•Place the muffle gauge to ensure correct muffle height and to provide for a 90-degree position of the muffle base relative to the pressing direction of the pressing oven. When placing the muffle gauge, investment compound must exit from the gauge opening.
• Let muffle rest until the investment (Cergo fit or Cergo fit SPEED) has set. Protect from vibration.
Pre-heating (Figure 5)
•When the investment has set, remove the various parts of the muffle.
• The muffle gauge contact point is cleaned and checked for 90-degree orientation. The muffle must not “rock”, as this may result in pressing errors.
• The muffle is placed in the pre-heating oven together with the aluminium oxide pressing die, which must be free of ceramic residue. The base temperature of the pre-heating oven will depend on your choice of investment material (refer to pertinent Instructions for Use).
• Heat the muffle from room temperature to 850 °C (refer to investment manufacturer’s recommendations for the proper heating procedure).
•When using Cergo fit SPEED investment, you may place the muffle directly into the oven pre-heated to 850 ºC after a setting period of 15 minutes.
Pressing technique
• Activate pressing program (see Pressing programs on p. 18)
•Remove the muffle from the pre-heating oven once the starting temperature of 700 °C has been reached.
•Place Cergo Kiss pellets in the muffle channel.
• Position the pressing die.
• Immediately place the muffle thus prepared in the pressing oven and start the pressing program (for Cergo press: press the start button one more time).
•Once the pressing process has been completed (after approximately 45 minutes), remove the muffle from the pressing oven immediately and allow to slowly cool to room temperature.
Divesting (Figure 6–7)
• Indicate the position of the pressed objects using the pressing die.
•Make a deep cut into the investment compound, preferably using a diamond-covered and sintered large carbide disc or a carbide disc for metal castings.
•Separate the part of the muffle containing the aluminiumoxide pressing die from the rest of the muffle by turning in opposite directions.
•Use a jet polisher (50 μm, 4 bar; do not use a revolvingjet unit) to remove the investment all the way to the pressed objects. In doing so, make sure not to touch the objects (abrade the “internal cylinder” and remove the external ring of investment).
•Once the objects have become visible, continue abrading across the area using reduced pressure (2 bar).
• Clean the aluminium-oxide pressing die using aluminium-oxide abrasive and rinse.
Finishing (Figure 8)
• Cut off the sprues using water cooling and no pressure.
• The restoration to be veneered or painted is then finished using diamond burs or stones. This will maintain the surface texture function.
•Use a steam cleaner (Aquaclean) to clean the object. Do not approach the object too closely with the nozzle (risk of local overheating).
Cergo Kiss: All pellets are compatible with painting and layering techniques.
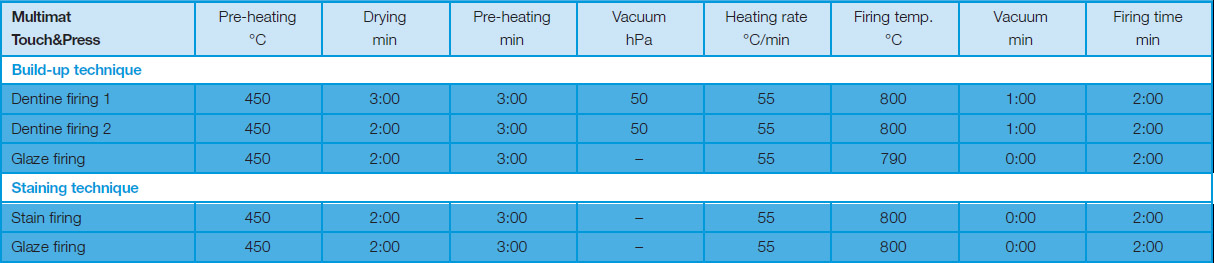
Staining technique (Figure 9)
• Detailed characterization of the ceramic surface as a stain firing (layering technique).
•Complete colour characterization after pressing with the P1 and P2 pellet. Reproduces all “V” colours.
•Gross or detailed characterization of all pressed pellets. (staining and layering technique).
•Use for all CTE-adjusted ceramics.
• In principle, all pellets can be used with body and incisal staints.
Build-up technique (Figure 10)
For veneers, inlays and crowns, use the layering technique and Duceragold Kiss. Dispense with the opaque firing and start building up the ceramics by analogy with ceramometal restorations. Firing a ceramic shoulder onto the Cergo Kiss framework is discouraged for reasons of stability.
Please note:
• To ensure the stability of the structure, allow adequate space for the Cergo restoration.
• To avoid tension, eliminate sharp line angles.
• Avoid preparation undercuts.
• The dentist should fill deep cavities by placing a core restoration.
• Pay particular attention to the design of the margin.
• Allow for a uniform wall thickness wherever possible.
• When preparing anterior or posterior teeth, maintain a framework to veneering material ratio of 50 : 50.
• For inlays, onlays and veneers, maintain a framework to veneering material ratio of 75 : 25.